Installation Guides
Armory System
It is best to install Armory Panels to a straight, flat, sturdy wall with standard stud spacing of 16″ on center, directly into the studs, even if it means the panel array will not be perfectly centered on the wall. This will ensure that your panel installation will be able to hold just about anything you put on it. If it must be centered, or if you have no other choice, you may purchase the required cleats to accomplish an off-stud installation, but this method will result in a somewhat diminished weight capacity. However, it will still be adequate for typical use.
Panel Arrays aligned to studs:
The Armory Wall Panels were designed to attach easily to standard 16″-on-center studs. This is the recommended installation method. Notice: Installation of larger panels is accomplished easiest with a helper.
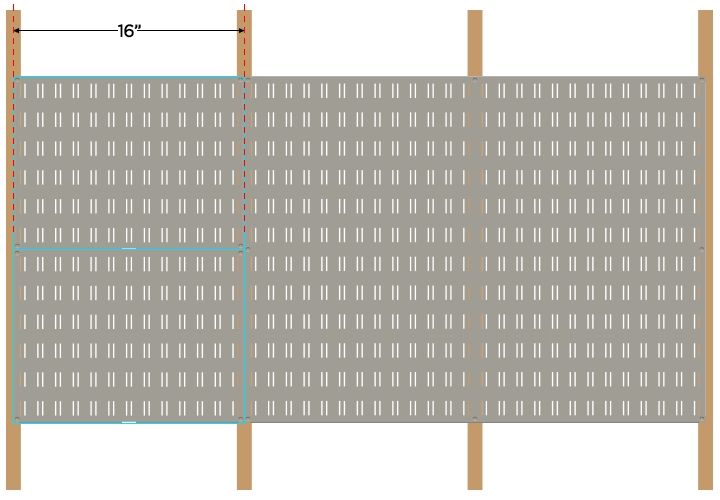
Most of the panels are sized in increments of 16″ in width, and 12″ in height. This allows panels of various sizes to create one continuous pattern of slots in any arrangement that you desire.
Obviously your wall will be clad with drywall or some other material. This is simply to show the location of the studs in relation to the panels.
- It is assumed that you have measured the wall and determined how your panels will be arranged.
- Locate the studs.
- Lightly mark the center of the studs on the wall with a pencil using a level to make sure the lines are plumb. Additionally, you may lay out your array with pencil before beginning.
- Align the EDGE of your starting panel to the vertical pencil line. Use the largest panel to do this.
- You should have the appropriate Corner Clips on hand for the installation. For information about determining which Corner Clips you will need, CLICK HERE.
Corner Clips are essential for direct-to-stud installation because they ensure perfect alignment of panels at the corners and edges, and they prevent the corner tabs from bending too much
- Mark the screw holes with a pencil, and drill pilot holes into the wall. Then with the appropriate Corner Clips positioned between the panel and the wall underneath the mounting holes, drive the #8 wood screws (provided) straight into the stud. Make sure the screw heads are flush with the panel.
- DO NOT OVERTIGHTEN. The corners may bend inward slightly. This is normal.
- Continue on, pressing the next panel onto the previous Corner Clip, driving the screws into the corners, positioning new Corner Clips where necessary, until finished..
Panel Arrays off-stud alignment:
The Armory Wall Panels may be installed in an off-stud alignment with the help of mounting cleats. There are two types: End Cleats and Binding Cleats. It may look complicated, but it’s really quite easy.
Please take note that cleats have two types of holes: Through holes with a countersink bevel, and smaller threaded holes. The countersunk holes are for mounting the cleat to the wall, and the threaded holes are for attaching the panel to the cleat.
Most of the panels are sized in increments of 16″ in width, and 12″ in height. This allows panels of various sizes to create one continuous pattern of slots in any arrangement that you desire.
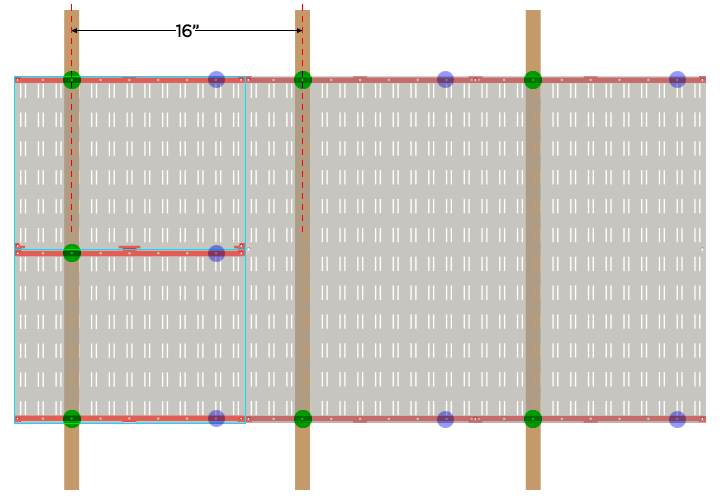
Cleat locations are indicated in RED. End Cleats are positioned at the very top and bottom of an array of panels, and Binding Cleats are used to connect two abutting panels top to bottom.
- It is assumed that you have measured the wall and determined how your panels (and cleats) will be arranged.
- Locate the studs.
- Lightly mark the center of the studs on the wall with a pencil using a level to make sure the lines are plumb. Additionally, you may indicate your panel layout with pencil before beginning.
- Draw a level pencil line indicating the TOP of your panel array and mark the width that you have determined.
- Place an End Cleat along the line, with the flat edges up, and hole countersinks facing outward.
- Find the closest countersunk hole on the cleat (spaced 2″ apart) that corresponds with the location of the stud underneath the cleat, and mark the location of the hole (indicated in GREEN on the illustration). You have a little over an inch of lateral leeway, as long as the screw is fully inside the stud.
- Drill a pilot hole and then attach the cleat with a #8 wood screw (provided). Leave it slightly loose for now.
- At the locations indicated by PURPLE, attach the cleat to the wall with a very sturdy type of wall anchor of your choice (not provided). Mark the wall with the cleat in position, drill holes for the anchors, and insert them into the wall. Then finish attaching the cleat with the #8 wood screws into the wall anchors, tightening all screws.
- Attach the topmost, largest panel to its corresponding cleat, at the top. Attach the panel to the cleat with two 8-32 flat head machine screws (provided). Leave somewhat loose.
- If there is another panel to be installed below the current one, insert a Binding Cleat inside the bottom of the panel and press it against the wall. The large side with the holes should be below the panel.
- In the corresponding holes as the cleat above, attach this cleat with wood screws into the stud and drywall anchor. Ensure that two panels will fit in the cleat slot before affixing to the wall.
- You should have the appropriate Thin Corner Clips on hand for the installation. For information about determining which Clips you will need, CLICK HERE.
- Attach the panel to the cleats with 8-32 flat head machine screws, while also positioning the Thin Corner Clips between the cleat and panel.
Corner Clips are essential because they ensure perfect alignment of panels at the corners and edges. THIN corner clips are used in conjunction with Cleats.
- The next steps will require some attention to detail as you will need to position the cleats, mark the holes as you can, drill pilot holes and install drywall anchors, all in an order which won’t require going back a step or two.
- Mark the screw holes with a pencil, and drill pilot holes into the wall. Then with the appropriate Corner Clips positioned between the panel and the wall underneath the mounting holes, drive the #8 wood screws (provided) straight into the stud. Make sure the screw heads are flush with the panel.
- DO NOT OVERTIGHTEN. The corners may bend inward slightly. This is normal.
- Continue on, pressing the next panel onto the cleat and previous Corner Clip, driving the screws into the corners, positioning new Corner Clips where necessary, until finished..